已写下 85 篇博客文章,共计 101,765 字,完整阅读预计需要 8.5 小时,已有 2,305,207 次阅读。
按照【分类】筛选文章
按照【标签】筛选文章

Stripe 支付 (使用 Next.js 部署到 Cloudflare)
使用 Stripe 为您的生意进行线上收款开发。
联邦宇宙(Mastodon、Fediverse)别名服务
一个开源的联邦宇宙别名服务。A Fediverse Alias Service for public
Cloudflare Email Routing 免费邮件发送服务
Cloudflare Email Routing 免费邮件发送(作为 Service 服务)用于 Workers/Pages 项目中。
Cloudflare KV 备份及迁移
# 背景 之前的项目一直都用的是免费的服务,后端 Vercel 托管,数据使用的 Cloudflare KV。 这其中就有一个很严重的问题:`延迟`。经常数据操作了,但是 KV 还是缓存的值。 现在索性全部换成 Cloudflare 全家桶,虽然可以直接用 KV,但结构化的数据可以用免费的 D1 额度。 从网上搜索了很多关于 Cloudflare KV 备份及迁移的文章,但是都不是很满意,所以自己写了一个。
代码灵魂——通过你的代码表达你的意图
> 曾经,我以为:“好的代码像首诗,烂的代码像坨屎。” 但对于代码质量的好坏、阅读性的好坏,却没有一个有效的度量标准。每个人心中的一杆秤,是不同的。 那么多年过去了,依然无法去统一所有人的编程思想。而什么样的代码,才是好的代码,渐渐地,在心中有了一部分标准的答案。
【教女朋友 从 0 到 1 学编程系列】三、2048 前端游戏实战
【教女朋友 从 0 到 1 学编程系列】二、快速掌握前端基础
首先明确一点学习的最根本原则: - 预习:是不可能预习的 - 复习:是不可能复习的 那么如何能够教女朋友快速从零基础上手写代码,将成为本课时的最关键内容。 前端的基础主要包括三个部分,HTML、CSS、JS,其中 HTML 和 CSS 是前端的基础,JS 是前端的核心。本课时主要讲解 HTML 和 CSS,JS 将在下一阶段重点讲解。 简单来说,HTML 是网页的骨架,CSS 是网页的皮肤,JS 是网页的灵魂。 ## HTML HTML 指的是超文本标记语言: **H**yper**T**ext **M**arkup **L**anguage 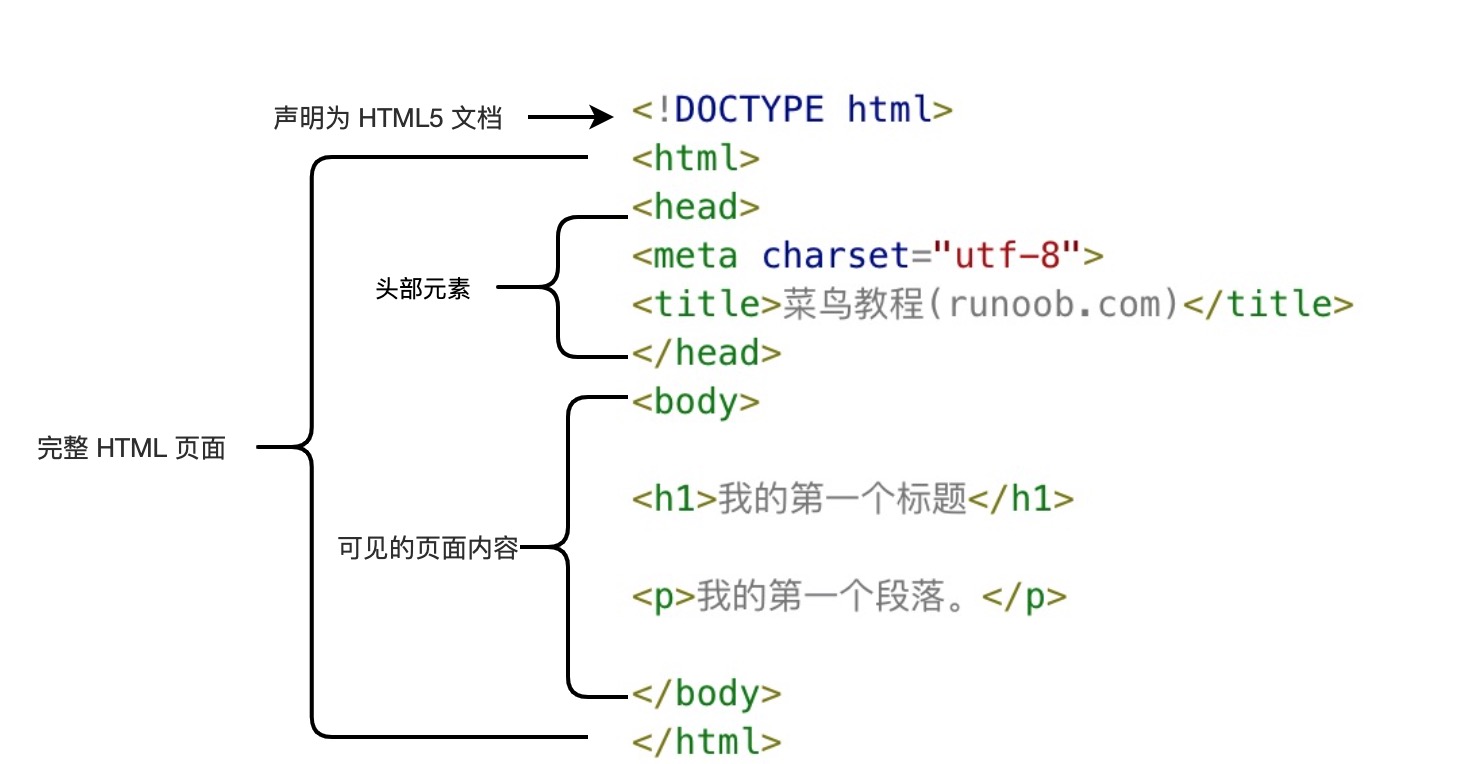 > 图片来自 [Runoob.com](https://www.runoob.com/html/html-intro.html) ### 通用声明 HTML 5: ```html <!doctype html> ``` 目前最常见的也是最简单的声明方式,其他还有 html 4.01、 xhtml 1.0 等,具体可以参考: [https://www.runoob.com/tags/tag-doctype.html](https://www.runoob.com/tags/tag-doctype.html) (`可以忽略不看`) 目前在大部分浏览器中,直接输出中文会出现中文乱码的情况,这时候我们就需要在头部将字符声明为 `UTF-8` 或 `GBK`。 整体页面结构: - `DOCTYPE` 声明 - `<html>` 页面元素 - `<head>` 头部信息元素(不会显示,内部元素顺序可以随意调整) - `<title>` 页面标题 - `<meta>` 元数据 - 其他头部信息 - `<body>` 网页主体 - 各元素内容 示例代码: ```html <!doctype html> <html lang="zh-CN"> <head> <meta charset="utf-8" /> <title>页面标题</title> </head> <body> <h1>我的第一个标题</h1> <p>我的第一个段落。</p> <!-- 这是一段注释,不会显示到页面中 --> </body> </html> ``` > [在线体验](https://www.runoob.com/try/try.php?filename=tryhtml_headers) ### head 元素 | 标签 | 描述 | | :
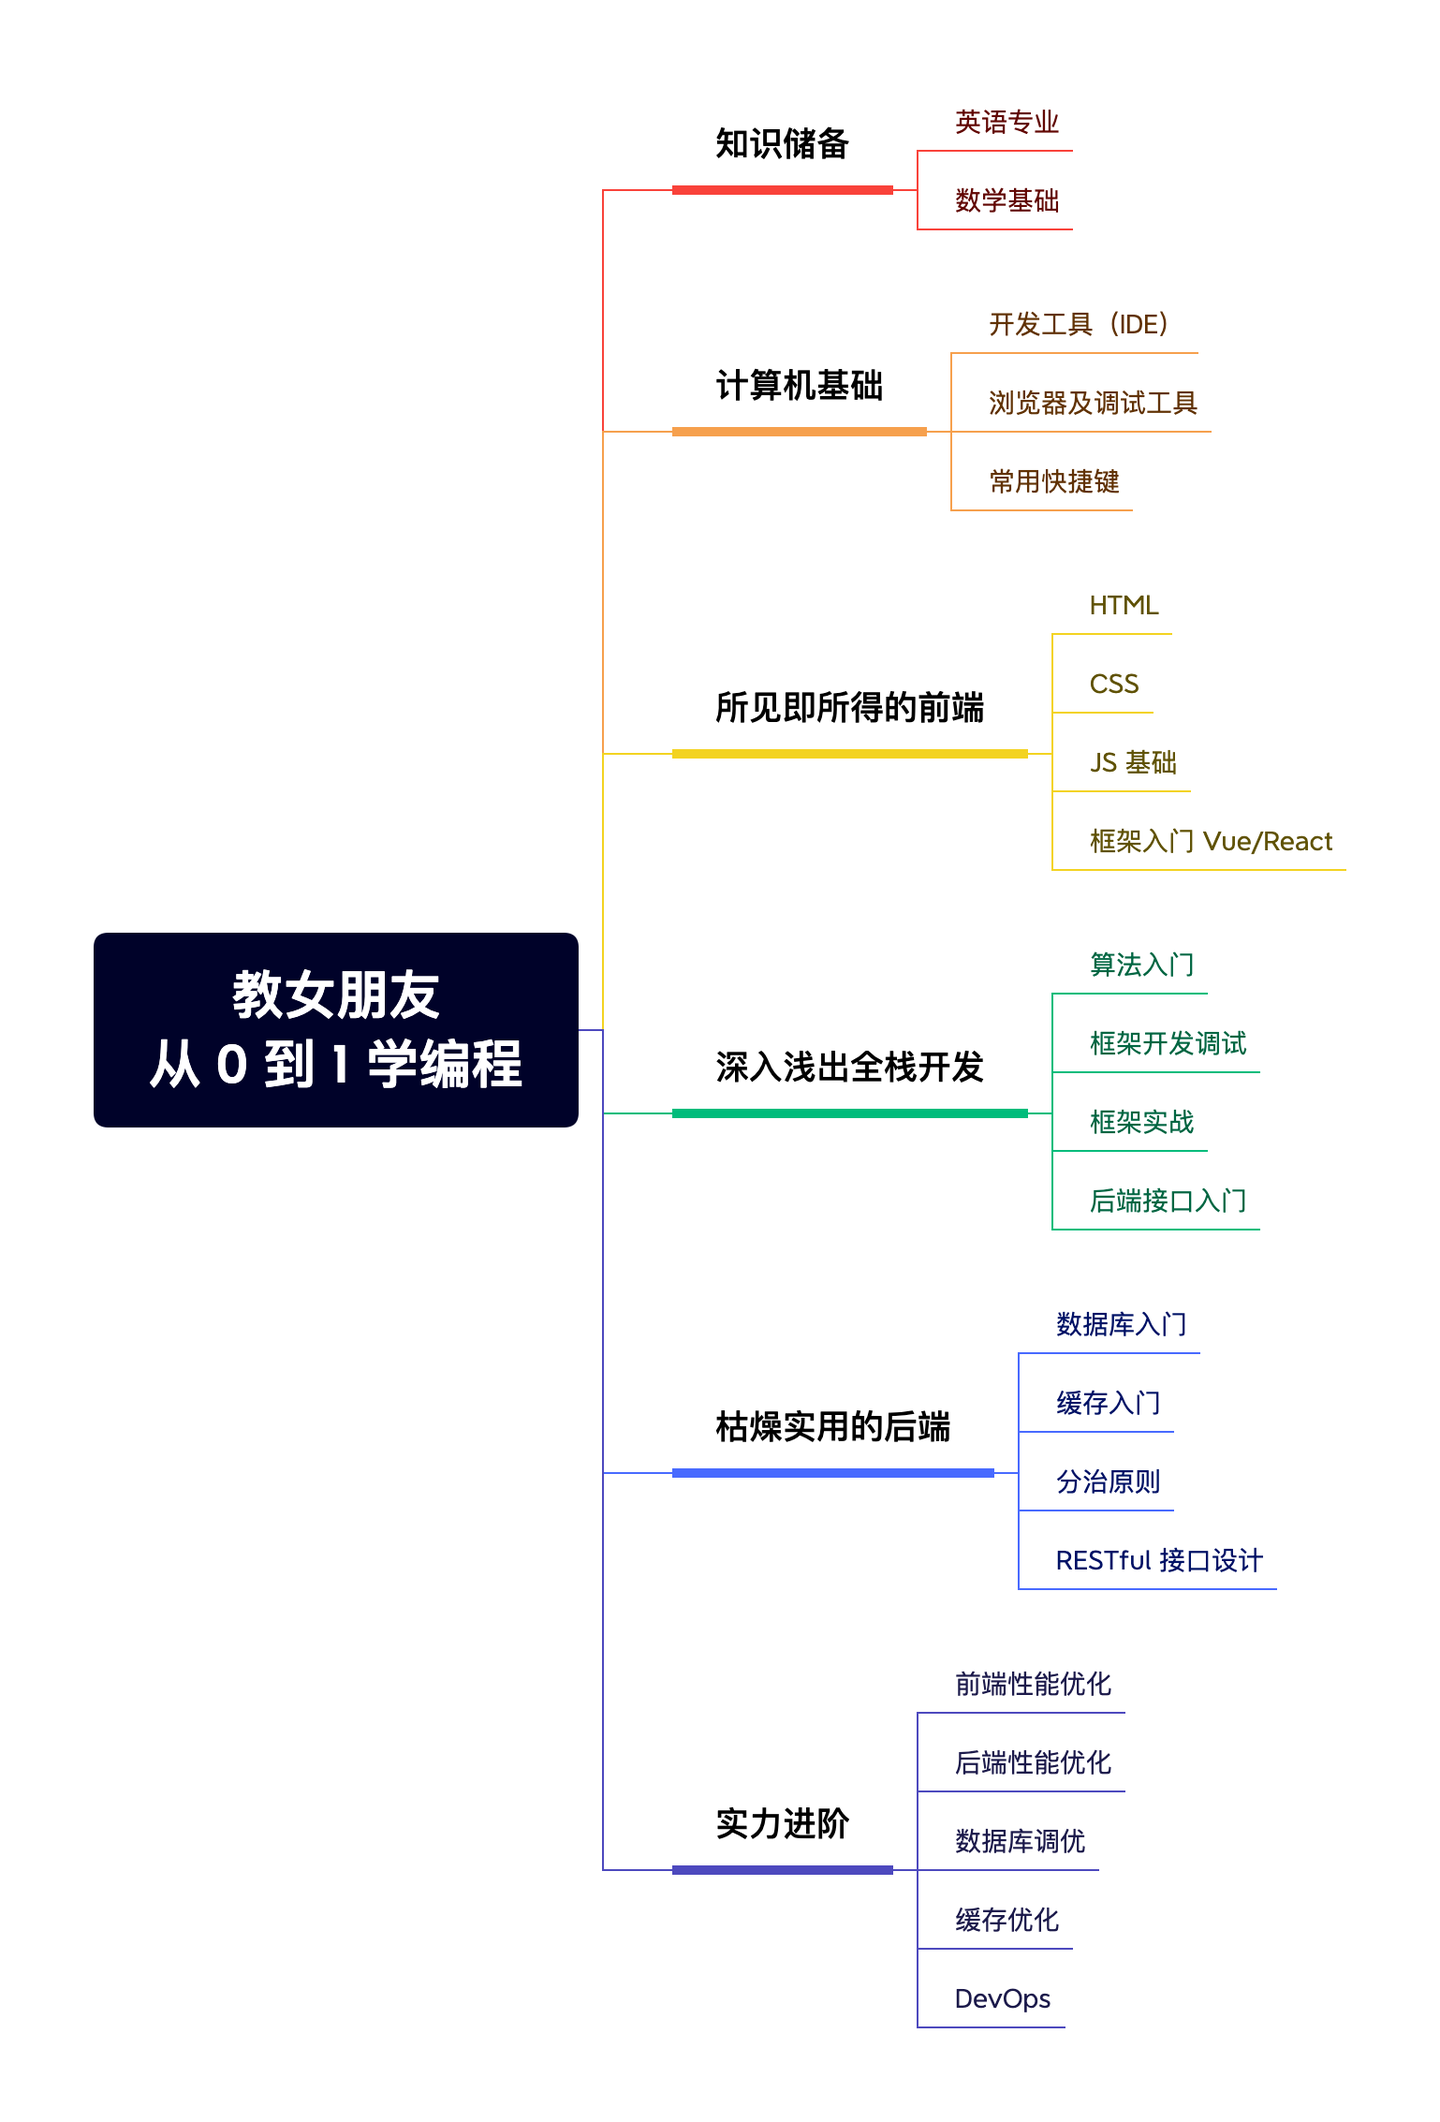
【教女朋友 从 0 到 1 学编程系列】一、计算机基础
教女朋友 从 0 到 1 学编程系列大纲,主要技术栈围绕 JS/TS 前后端,欢迎完善补充,提出宝贵意见。
Next.js (React) 实用进阶技巧
自用整理的 Next.js 或 React 项目进阶小技巧。
remote-cloudflare-kv 在 Vercel 上使用 Cloudflare KV
最近我在做 Next.js 项目部署 Cloudflare Pages 时发现本地开发调试、登录鉴权等好多问题,所以又想要切回到 Vercel 中,便有了这么一个项目,可以在 Cloudflare 以外的环境上得到类似于 Worker Runtime 的 KV 使用体验。

Mastodon 长毛象多租户:自定义域名、自定义账号别名
如果您想要一个属于自己的账号别名,但没有服务器的话,可以参考一下我的发电计划: https://afdian.com/a/willin
安装部署 Mastodon 长毛象去中心化微博系统
如果您想要一个属于自己的账号别名,但没有服务器的话,可以参考一下我的发电计划: https://afdian.com/a/willin
Next.js 13 appDir 实战 i18n
# 背景 官方目前未打算支持 i18n 国际化路由支持,且尚未提供解决方案,但是我们可以通过实验特性 appDir 来实现。 > ## Not Planned Features > > We are currently not planning to include the following features in app: > > - Internationalization (i18n) - we will be providing a guide on how to implement internationalization in app. > - AMP Support > > If you need any of these features, we will continue to support `pages`, including bug fixes and feature additions, for multiple major versions. 文档地址: https://beta.nextjs.org/docs/app-directory-roadmap#not-planned-features 首先需要了解一下 `Server and Client Components` 服务器组件和客户端组件。 | What do you need to do? | Server Component | Client Component | | :
NFT 数字藏品从设计到发布
本系列专栏主要内容涵盖从平台选择、前期规划、NFT 藏品设计、批量生成以及平台上线所有阶段。

在 Wordpress 中集成 Authing SSO
# 安装 - Github [下载插件](https://github.com/Authing/wp-authing/releases) 并上传安装 - 插件安装页面搜索 Authing 并安装  按照插件提示进行配置。 - 填写 Authing 应用域名 - 将对应的配置项在 Authing 控制台中进行设置 - 填写 App ID 和 App Secret 进行保存 Authing 控制台配置示意如下图: 

今年的情人节,给心爱的她一个不一样的礼物吧
今天是 2022 年 2 月 2 日,距离今年的情人节只有不到两周的时间了。 给大家隆重介绍一个网站,[憨憨.我爱你](https://xn--wkua.xn--6qq986b3xl/) 参考示例网站: - [表白幻灯片.憨憨.我爱你](https://xn--owtp31bqkbezhj50a.xn--wkua.xn--6qq986b3xl/) - [源码](https://github.com/willin-love/romantic_page) - [恋爱计时器.憨憨.我爱你](https://xn--m7rx3unue2vok44a.xn--wkua.xn--6qq986b3xl/) - [源码](https://github.com/willin-love/romantic_page) # 申请流程 打开官网首页: [憨憨.我爱你](https://xn--wkua.xn--6qq986b3xl/) (由于该网站数据库使用的是 PlanetScale 免费服务,位于美东,所以访问可能会稍微有点慢。请耐心等待。)  使用 [Authing](https://www.authing.cn/?utm_source=v0&utm_campaign=hanhan) 账号登录(可以手机、邮箱注册,Github 账号登录,或者微信小程序扫码,后续还会添加更多登录方式)。  可以分别点击进入域名申请和邮箱申请。 ## 域名申请 域名申请界面如下:  支持的绑定方式有三种: - CNAME: 可以使用 Github Pages、 Netlify、 Gitee、 Coding.net、 Cloudflare 等提供托管服务的平台 - 值参考: `willin.github.io` - 注意: 不支持 Vercel ,因为 Vercel 默认情况下并不支持绑定二级域名(除非所有权在你个人名下) - A: IPv4 需要自己搭建服务器,并进行绑定 - 值参考: `1.2.3.4` (你服务器的 ip 地址) - AAAA: IPv6 需要自己搭建服务器,并进行绑定 - 不做表述,不太推荐非专业人士选择 - 如果你需要同时绑定 IPv4 和 IPv6 的话,建议建议注册 A 类型,然后 ISSUE 或邮件联系我配合处理 其中还有一项 Proxied(CDN),如果不知道作用,可以尝试开启或关闭来测试。 ## 邮箱申请 域名申请界面如下:  目前使用了 Cloudflare 的邮件转发服务,但由于暂不支持 IDN 域名,所以可以提前抢注,第一时间拥有。 ## 其他说明 ### 如需帮助 欢迎在 Github 上关注我: [willin](https://github.com/willin) ,如果在为心爱的她准备礼物时遇到问题,可以为你免费提供技术咨询。 ### 还想要其他的域名 - [js.cool](https://github.com/js-cool) (在多次协商后,目前已经支持 Vercel 绑定) - log.lu (敬请期待) ### 感觉慷慨 - 您可以将该网站分享给更多的人 - 您也可以通过以下渠道进行打赏: - [微信](https://willin.github.io/images/wx.png) - [支付宝](https://willin.github.io/images/alipay.png) - [爱发电](https://afdian.com/@willin) - [Github Sponsors](https://github.com/sponsors/willin) - [Paypal](https://www.paypal.com/paypalme/willinwang) ### 跃跃欲试 或许你也有很多想法,想要实现。您可以: - 使用 [Authing](https://www.authing.cn/?utm_source=v0&utm_campaign=hanhan) 快速集成开发你自己的应用 - Fork 本项目源码(完全开源),并提供你自己的域名服务 - [项目源码](https://github.com/willin/xn--wkua.xn--6qq986b3xL) - 在 Github 上对本项目进行完善和优化 - [项目后续规划](https://github.com/willin/xn--wkua.xn--6qq986b3xL/issues/3)

全栈框架应用快速集成 Authing SSO
分别以 Next.js 和 Remix 框架为例,讲解如何在半小时内快速集成 Authing SSO

Authing 团队管理 + Wechaty 机器人 = 无限可能
分别以微信群、飞书、Authing 作为上游用户源,构建人事管理机器人的实际案例教程。
你好 Remix 博客
在博客沉寂了很久之后,我决定重新做一个。 - 初瘦: [v0.chat](https://v0.chat) - 2018 年 - 用 Nuxt.js 框架封装了一个仅有 255 行代码的博客系统 [Nuxtpress](https://github.com/assholev0/nuxtpress) - 《不可替代的团队领袖培养计划》: [leader.js.cool](https://leader.js.cool) - 2016 年 - 先后用过 Gitbook、Docsify 和 Nuxt.js (Nuxt Content) - 山沟沟: [sh.gg](https://sh.gg) - 2015 年 - 使用的 Hexo 和 Next 主题,去年底换成了 Icarus Cyberpunk 主题,发布过 [Hexo Wordcount](https://github.com/willin/hexo-wordcount) 插件 - Willin.org、 Willin.me 等 - 从 2009 年开始使用 Wordpress 搭建 - 一直到 2015 年前后,不再使用自建服务器,改为纯静态化博客 - best02.cn、 Agean.com.cn 等 - 从 2002 年起,使用过 Z-Blog、Emlog、Typecho 等各种博客系统去搭建动态博客 # 技术选型 | 项目 | 选择 | | :

Discourse 零代码集成 SSO 教程
# Discourse 是什么? Discourse 是 Stack Overflow 的联合创始人 Jeff Atwood 推出的一个新的开源论坛项目,其目的是为了改变十年未变的论坛软件,摒弃了传统论坛的话题讨论形式、拥有自学习系统、全 Web 应用同时适用于桌面和移动终端。 # Authing 是什么? [Authing](https://www.authing.cn/?utm_source=v0&utm_campaign=blog) 是国内首款以开发者为中心的全场景身份云产品,集成了所有主流身份认证协议,为企业和开发者提供完善安全的用户认证和访问管理服务。 以「API First」作为产品基石,把身份领域所有常用功能都进行了模块化的封装,通过全场景编程语言 SDK 将所有能力 API 化提供给开发者。同时,用户可以灵活的使用 Authing 开放的 RESTful APIs 进行功能拓展,满足不同企业不同业务场景下的身份管理需求。 ## 传统系统 SSO 单点登录改造 首先,需要对原有系统的用户体系进行改造,使其能够适应通用的用户认证标准协议(如 OAuth)。如果系统体量较大,甚至还需要考虑将原有业务中的用户体系抽出,专门做成单点登录的用户中心。需要进行设计、编码、测试、升级、扩容等一系列复杂的开发运维操作,才能够实现。 该方式耗时间,耗精力,耗成本,风险大(需要在业务领域之外不断去踩坑)。 ## Authing SSO 集成 如果您的应用是基于 Authing 提供的身份系统进行开发,那么恭喜你,可以使用较少的代码(或者配置)即可轻松几步,快速完成单点登录的集成。 该方式低成本,无须额外设计和开发,采用标准协议,轻松打通。 # Discourse 安装 参考资料: - Discourse 官方 Docker 仓库: [https://github.com/discourse/discourse_docker](https://github.com/discourse/discourse_docker) - 安装指南文档: [https://github.com/discourse/discourse/blob/main/docs/INSTALL-cloud.md](https://github.com/discourse/discourse/blob/main/docs/INSTALL-cloud.md) 建议将 Discourse Docker 仓库 Fork,并在本地先进行开发调试确认无误后再进行产品环境的安装。下面是简单的安装步骤说明及配置中常见问题的 FAQ。 注意:请在 Linux 服务器或者 macOS 下进行安装(Windows 需要自行摸索一下)。 ## 拉取 Discourse Docker 仓库 ```bash git clone https://github.com/discourse/discourse_docker.git /var/discourse cd /var/discourse ``` 使用自动化配置脚本: ```bash ./discourse-setup ``` 非 `root` 用户的话,需要在前面加 `sudo` 运行。根据提示一步一步输入配置项,完成安装配置。默认的配置在本地运行的时候大概率会运行不起来。 打开 `containers/app.yml` 配置文件进行配置调整,如果手动配置,也可以执行: ```bash cp samples/standalone.yml containers/app.yml ``` 复制一个示例模板作为开始。 ## 应用配置 在开始配置之前,先确保域名已经绑定到服务器上(DNS 中的 A 记录绑定),或者本地修改 `/etc/hosts` 文件(不要使用 example.com 或者需要强制 https 的域名后缀作为本地开发调试,如: `.app`、`.dev`等)。 环境变量设置参考: ```yaml env: LC_ALL: en_US.UTF-8 LANG: en_US.UTF-8 LANGUAGE: en_US.UTF-8 EMBER_CLI_PROD_ASSETS: 1 # DISCOURSE_DEFAULT_LOCALE: en ## How many concurrent web requests are supported? Depends on memory and CPU cores. ## will be set automatically by bootstrap based on detected CPUs, or you can override #UNICORN_WORKERS: 3 ## TODO: The domain name this Discourse instance will respond to ## Required. Discourse will not work with a bare IP number. DISCOURSE_HOSTNAME: 'discourse.local' ## Uncomment if you want the container to be started with the same ## hostname (-h option) as specified above (default "$hostname-$config") # DOCKER_USE_HOSTNAME: true ## TODO: List of comma delimited emails that will be made admin and developer ## on initial signup example '[email protected],[email protected]' DISCOURSE_DEVELOPER_EMAILS: '[email protected]' ## TODO: The SMTP mail server used to validate new accounts and send notifications # SMTP ADDRESS, username, and password are required # WARNING the char '#' in SMTP password can cause problems! DISCOURSE_SMTP_ADDRESS: smtp.mail.qq.com DISCOURSE_SMTP_PORT: 25 DISCOURSE_SMTP_USER_NAME: [email protected] DISCOURSE_SMTP_PASSWORD: 'password' DISCOURSE_SMTP_ENABLE_START_TLS: fales # (optional, default true) DISCOURSE_SMTP_AUTHENTICATION: plain DISCOURSE_SMTP_OPENSSL_VERIFY_MODE: none DISCOURSE_NOTIFICATION_EMAIL: [email protected] ## If you added the Lets Encrypt template, uncomment below to get a free SSL certificate #LETSENCRYPT_ACCOUNT_EMAIL: [email protected] ## The http or https CDN address for this Discourse instance (configured to pull) ## see https://meta.discourse.org/t/14857 for details #DISCOURSE_CDN_URL: https://discourse-cdn.example.com ## The maxmind geolocation IP address key for IP address lookup ## see https://meta.discourse.org/t/-/137387/23 for details #DISCOURSE_MAXMIND_LICENSE_KEY: 1234567890123456 ``` 简单说明: - `UNICORN_WORKERS`:根据 CPU 数量决定 Worker 数量或者手动配置 - `DISCOURSE_HOSTNAME`:正确配置域名 - `DISCOURSE_SMTP_XXX`:正确配置 SMTP 邮件发送服务,不然会收不到验证码和通知邮件 插件配置: ```yaml ## Plugins go here ## see https://meta.discourse.org/t/19157 for details hooks: after_code: - exec: cd: $home/plugins cmd: - git clone https://github.com/discourse/docker_manager.git - git clone https://github.com/discourse/discourse-oauth2-basic.git - git clone https://github.com/angelim/discourse_user_auto_activation.git ``` 这三个插件的作用: - Docker 管理,自带默认 - OAuth 2 集成,用于与 Authing SSO 连接实现单点登录 - 自动激活(邮箱)插件,可选 ## 启动论坛服务 提醒:先配置好 SSL 证书再启动服务(参考 FAQ SSL 证书配置,或者使用 Let's Encrypt 签发证书)。 配置完成后制作镜像: ```bash ./launcher bootstrap app ./launcher start app ``` 如果已经初始化过,可以通过重新制作镜像的方式: ```bash ./launcher rebuild app ``` 过程漫长,耐心等待。下面整理了我在调试过程中遇到的一些问题和一些提示。 ## FAQ ### 域名配置 主要修改模板: ```yaml templates: - 'templates/postgres.template.yml' - 'templates/redis.template.yml' - 'templates/web.template.yml' - 'templates/web.ratelimited.template.yml' ## Uncomment these two lines if you wish to add Lets Encrypt (https) - 'templates/web.ssl.template.yml' #- "templates/web.letsencrypt.ssl.template.yml" ``` - 如果需要 SSL 支持, `"templates/web.ssl.template.yml" ` 这个模板文件需要引入。 - 如果需要免费的域名证书更新, `"templates/web.letsencrypt.ssl.template.yml"` 这个模板需要引入。 同时根据需要,将端口开放出来: ```yaml ## which TCP/IP ports should this container expose? ## If you want Discourse to share a port with another webserver like Apache or nginx, ## see https://meta.discourse.org/t/17247 for details expose: - '80:80' # http - '443:443' # https ``` ### SSL 证书配置 首先确认一下文件目录的映射是否正确: ```yaml ## The Docker container is stateless; all data is stored in /shared volumes: - volume: host: /var/discourse/shared/standalone guest: /shared - volume: host: /var/discourse/log/var-log guest: /var/log ``` 类似这样的目录映射,将证书文件放置到对应的 ssl 目录下,检查这两个文件路径是否正确: ```yaml /var/discourse/shared/standalone/ssl/ssl.crt /var/discourse/shared/standalone/ssl/ssl.key ``` 自签证书参考: ```bash openssl genrsa -aes256 -passout pass:gsahdg -out ssl.pass.key 4096 openssl rsa -passin pass:gsahdg -in ssl.pass.key -out ssl.key openssl req -new -key ssl.key -out ssl.csr # You are about to be asked to enter information that will be incorporated # into your certificate request. # What you are about to enter is what is called a Distinguished Name or a DN. # There are quite a few fields but you can leave some blank # For some fields there will be a default value, # If you enter '.', the field will be left blank. #
Promise、async/await 使用经验
# Promise 产生:改善 Callback Hell 问题 ## 什么样的方法可以用 Promise 重写 例 1: ```javascript mysql.query('SELECT 1 + 1 AS solution', function (err, rows, fields) { if (err) { throw err; } // 对查询结果进行操作 console.log('The solution is: ', rows[0].solution); }); ``` 例 2: ```javascript fs.readFile('myfile.txt', function (err, file) { if (err) { throw err; } // 对file进行操作 }); ``` ## 如何将一个回调方法改为 Promise ### Promisify 一般情况下,该方式首选。 ```javascript const util = require('util'); const fs = require('fs'); const stat = util.promisify(fs.stat); stat('.') .then((stats) => { // Do something with `stats` }) .catch((error) => { // Handle the error. }); ``` ### new Promise() 虽然所有的最终实现原理应该都是这样,但这种写法上的话,又再次出现了地狱回调的问题,可读性非常差。 ```javascript const fs = require('fs'); const stat = (...args) => new Promise((resolve, reject) => { fs.stat(...args, (err, stats) => { if (err) { reject(err); } else { resolve(stats); } }); }); stat('.') .then((stats) => { // Do something with `stats` }) .catch((error) => { // Handle the error. }); ``` ### Defer 兼顾了可读性的一种写法。 ```javascript const fs = require('fs'); const getDefer = () => { const deferred = {}; deferred.promise = new Promise((resolve, reject) => { deferred.resolve = resolve; deferred.reject = reject; }); return deferred; }; const stat = (...args) => { const deferred = getDefer(); fs.stat(...args, (err, stats) => { if (err) { deferred.reject(err); } else { deferred.resolve(stats); } }); return deferred.promise; }; stat('.') .then((stats) => { // Do something with `stats` }) .catch((error) => { // Handle the error. }); ``` ## 如何调用 Promise 方法 ### 直接执行 ```javascript promiseFn() .then() .catch() .then() // 此处的 .then 未经过异常捕获 .finally(); // 不管成功失败,最终都将执行 ``` ### 批量执行 ```javascript Promise.all([promiseFn1(), promiseFn2()]).then(); Promise.allSettled(); // 推荐 Promise.race(); Promise.any(); ```
模块化开发、容器化开发
愉快地使用 Manjaro 21 玩耍
Nest.js 基础入门
除了在 Controller 中,在 Model、 Service 等其他地方内层方法均可以进行优化,因为外层调用的时候已经带上了 `await`。同时,还需要注意各个方法的返回类型,养成良好习惯。

Nuxtpress - Node.js 动态网站静态化之路
相信 Hexo、Ghost、WordPress 等常见的开源内容框架对于很多人来说都不陌生。
愉快地使用 ElementoryOS 5 玩耍

开篇:你好,世界!
不能免俗。第一篇文章依然是 “Hello World!”作为技术人的标配,前前后后 N 个博客也都是以此作为序章。
VSCode 配置 Webpack 路径提示及智能跳转
Docsify 画图建模 Mermaid 插件支持
优雅地使用平板进行远程OS X编码开发
国内可备案域名后缀及价格列表
前端阅读体验优化-GitBook自动换肤
Gitbook 捐赠打赏插件
JS 判断一个数是否为 2 的 N 次幂
问题: > 判断一个数(x)是否为 2 的 N 次幂,如果是,返回是 2^n 中的 n,如果不是返回 false 约束: `x <= 2^800` ## SB 青年版 不用说,递归肯定是最 sb 的版本: ```js function power2sb(x, n) { n = n || 0; if (x === 1) { return n; } if (x < 1) { return false; } return power2sb(x / 2, n + 1); } ``` 结果测试: ```js console.log(power2sb(4)); // 2 console.log(power2sb(5)); // false console.log(power2sb(65536)); // 16 console.log(power2sb(Math.pow(2, 52) + 1)); // false console.log(power2sb(Math.pow(2, 53) + 1)); // false 实际结果:53 ``` ## LowB 青年版 低级循环版,与上一个版本半斤八两。 ```js function power2lb(x) { var n = 0; while (x >= 1) { if (x === 1) { return n; } x = x / 2; n++; } return false; } ``` 结果测试: ```js console.log(power2lb(4)); // 2 console.log(power2lb(5)); // false console.log(power2lb(65536)); // 16 console.log(power2lb(Math.pow(2, 52) + 1)); // false console.log(power2lb(Math.pow(2, 53) + 1)); // false 实际结果:53 ``` ## 普通青年版 ```js function power2nm(x) { // 奇数肯定不是2的N次幂 if (x % 2 === 1) { return false; } // 总结规律 // 2^2=4 // 2^3=8 // 2^4=16 // 2^5=32 // 2^6=64 // 2^7=128 // 2^8=256 // 2^9=512 // 所以,个位不可能为 0 if (x % 10 === 0) { return false; } var n = 0; while (x >= 1) { if (x === 1) { return n; } x = x / 2; n++; } return false; } ``` ## 文艺青年版 位运算,无循环。 ```js function power2fs(x) { // 一句话版本 return (x & (x - 1)) === 0 ? (x - 1).toString(2).length : false; /* 解释: 1. (x & ( x - 1)) === 0 先来寻找一下规律: 2^2=4 对应二进制为 100 2^3=8 1000 2^4=16 10000 所以, 2^N=1+N个0 2^N-1=N个1 100 & 11
Node.js阿里云接口(Aliyun API)SDK
MySQL 跨表数据同步优化
Hexo 文章阅读时长预计
js版 Leetcode Single Number
Hexo 文章计数插件 WordCount
灵感来自[简书](http://www.jianshu.com/users/6c72e78080ff)。 字数统计的结果跟简书有差异,主要是由于本插件只统计了中文字数和英文单词数,所以结果会比简书统计的字数略少一些。 特别适合文字爱好者,比如我。 [](https://npmjs.org/package/hexo-wordcount) [](https://npmjs.org/package/hexo-wordcount) 项目地址: [https://npmjs.org/package/hexo-wordcount](https://npmjs.org/package/hexo-wordcount) ## 安装和使用 ### 安装 ``` npm i --save hexo-wordcount ``` ### 使用 修改`Themes`模板文件,在`Post`文章模板区域加入: ``` <span class="post-count">{{ wordcount(post.content) }}</span> ``` 即可统计单篇文章的字数。 ``` <span class="post-count">{{ totalcount(site) }}</span> ``` 上面这句是统计总字数的,可以放到`Footer`或其他位置里。
js版 Leetcode接受率最低题valid-number
js版Leetcode第一难题wildcard-matching
js版 Leetcode spiral-matrix-ii
API接口性能统计之平均响应时间算法
日本雅虎程序员跳槽程序测试问题
卸载 Mac 默认的 Xcode 附带的 git